![eccv-2011]() Infoblox DHCP is based upon ISC DHCP with a few tweaks here and there. The DHCP failover mechanism that it employs started as a relatively simple 14 page IETF draft proposal (available here) that was implemented in Alcatel-Lucent VitalQIP (then Quadritek, the authors of the draft). Over a period of time, the draft was reviewed, revised and extended until it reached 133 pages (available here).
Infoblox DHCP is based upon ISC DHCP with a few tweaks here and there. The DHCP failover mechanism that it employs started as a relatively simple 14 page IETF draft proposal (available here) that was implemented in Alcatel-Lucent VitalQIP (then Quadritek, the authors of the draft). Over a period of time, the draft was reviewed, revised and extended until it reached 133 pages (available here).
I have had many arguments with my peers over the years about the complexity of the current draft (note, it is still not a full RFC) and whether it is strictly necessary (note, VitalQIP still uses the original simple draft proposal), but having deployed quite a few Infoblox systems now I have come to the conclusion that it actually does work pretty well. (If you really want to read something that will blow your mind, take a look at this formal perspective to the DHCP failover protocol).
However, if certain things are not configured correctly, operational issues can occur, and this is when it helps to have an understanding of how the DHCP servers function when configured in a failover scenario and the various “states” that the DHCP servers can enter.
Pre-requisites
Firstly, there are a couple of things that should be checked to ensure a reliable DHCP failover service:
- Ensure your DHCP members’ clocks are synchronized using NTP. This is incredibly easy to achieve by configuring the grid master with at least 3 NTP servers. You can use publicly available NTP servers on the Internet, or you can use your own, or a mixture. If you need to provide an NTP time source, we sell suitable NTP appliances that receive their time signal from a GPS satellite or long-wave radio signal here. Servers in a DHCP failover association must have their time synchronized, if they are more than 60 seconds apart, then the failover association will not function normally and you will encounter problems that can cause a serious outage.
- Ensure all IP helper addresses/DHCP relay agents point to the IP addresses of BOTH DHCP servers. Do not think you can get away with just using one, you will experience problems.
Configure the Failover associations
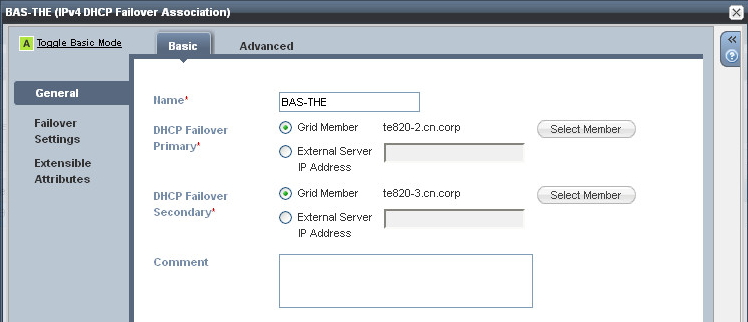
We’ve already mentioned failover associations but not explained what they are.
Simply put, a failover association defines the relationship between a pair of DHCP servers. You can have multiple associations, such as discrete pairs of servers, or you can arrange them in a star/hub and spoke relationship, with one or more servers acting as a central secondary, or peer. Technically speaking we don’t really have primary and secondary servers, they are just known as peers, but sometimes you do see references to a “backup” server, which really just means “the other peer”.
![dhcp failover association]()
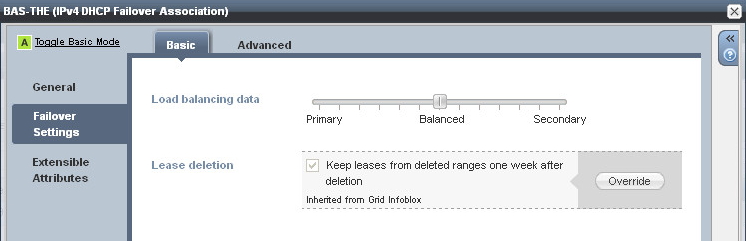
You can configure the load balancing value between the servers to determine which server handles more IP address requests: The default is a 50/50 split, so each peer will respond to requests on a (roughly) equal basis. This works fine for most deployments. However one scenario where you may wish to change this ratio is in a hub and spoke deployment, where the primary server is at a remote site, being backed up by a central secondary server. In this case, you would configure the primary server to handle the majority of requests.
![dhcp failover load balancing]()
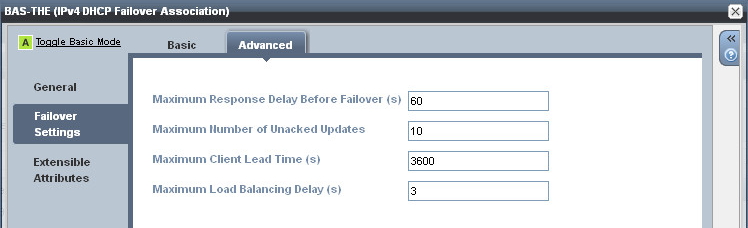
The failover association does have some timers associated with it, but the default settings normally work quite well so it’s only necessary to tweak these in specific circumstances.
![dhcp failover timers]()
The timers are described below:
- Max Response Delay Before Failover(s)
The number of seconds that a peer can go without receiving a message from its peer before assuming the connection has failed and going into a failover state.
- Max Number of Unacked Updates
The number of unacked packets a peer can send before a failover occurs.
- Max Client Lead Time(s)
The initial lease time handed to a client, and the lease time given to clients in a failover situation. This also determines how long it takes for a peer to recover all IP addresses after moving to the ‘partner down’ state. The MCLT is a trade-off between lease time (so higher server load) and recovery time. The default of one hour is normally sufficient, but I have experienced situations where a shorter MCLT would have been beneficial, and in fact Bluecat takes this approach by using a default value of 30 minutes. A shorter MCLT can help speed up divergent servers after a major outage but will cause additional server load.
- Max Load Balancing Delay(s)
Typically both peers will receive DHCP broadcast traffic from clients, but only one peer will respond (based on a hash algorithm of the clients MAC address). If the peer that is not expected to respond continues to see client DHCPDISCOVERs (maybe the client is retransmitting because it did not received a DHCPOFFER from the other peer) it can disable load balancing and respond to the client with a DHCPOFFER packet of its own.
NOTE: This function is dependent on the client setting the ‘elapsed time’ value in its DHCP packet correctly. If the client doesn’t set this value (i.e. the elapsed time value is always 0), then the peer that is not expected to respond will remain silent and the client will not receive a lease. This behaviour has been seen on Linux clients due a bug in the dhcpclient component.
Once a failover association has been defined in the Infoblox GUI, then DHCP ranges can be assigned to it and addresses will be divided up between the two peers. One thing to note is that both DHCP servers need to be assigned to the network, this ensures that fixed addresses get assigned to both peers (fixed addresses do not participate in the failover mechanism).
The DHCP service will need to be started on both peers, as it is not running by default.
Normal operation
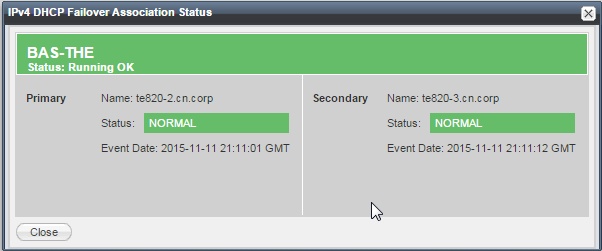
The failover association status can be monitored in the Infoblox GUI, either on the dashboard (using the ‘failover association status’ widget) or in the DHCP panel. The status panel should be green with both peers reporting the status as ‘Normal’.
![dhcp failover status]()
Syslog is a good place to monitor DHCP failover associations. As mentioned earlier, normally only one peer will respond to a clients DHCPDISCOVER broadcast. You will see messages similar to the following on the peer that didn’t respond:
dhcpd[32190]: debug DHCPDISCOVER from 00:0c:29:34:a6:d0 via eth1 : load balance to peer BAS-THE(1447370032p)
dhcpd[32190]: debug DHCPREQUEST for 192.168.0.111 (192.168.0.63) from 00:0c:29:34:a6:d0 via eth1 : lease owned by peer
Also, filtering by the phrase ‘failover peer’ gives a history of the different failover association states:
dhcpd[1802]: info failover peer BAS-THE(1447370032p): I move from normal to communications-interrupted
dhcpd[1802]: info failover peer BAS-THE(1447370032p): peer moves from normal to normal
dhcpd[1802]: info failover peer BAS-THE(1447370032p): I move from communications-interrupted to normal
Monitoring leases
When a DHCP client gets a new IP address, its lease time is that of the MCLT value (typically 1 hour). When the client renews the IP at the T1 timer (usually 50% of the lease time), it will get the lease time applicable to that scope (e.g. 7 days). The initial 1 hour lease is given out because a DHCP peer can only allocate a lease for a limited amount of time (MCLT) until its peer ‘knows’ about the lease.
The ‘Current Leases’ view can be used to view information about current leases. When using DHCP failover, there will be two entries displayed for each IP address as both peers should have information about the lease.
![dhcp lease viewer]()
The lease ‘State’ column provides information about the current state of each lease. The usual states are:
- ACTIVE: The address is currently in use by a client.
- FREE: The address is available for lease, and will be handed out by the primary peer.
- BACKUP: The address is available for lease, and will be handed out by the secondary peer.
Other states that may be seen are:
- ABANDONED: The server received a ping response when checking if the lease is free prior to leasing, and therefore won’t offer it to a client. This typically occurs when someone has configured a static IP on their system that is part of a DHCP range. Abandoned leases are often misunderstood, especially the circumstances that lead to their reclamation by the DHCP server, so we have a whole article dedicated to the subject of abandoned leases here.
- EXPIRED: The address is no longer used by a client, but is still bound to that client (meaning that the client will “probably” receive that address again if it asks for a new lease).
During a ‘Normal’ state, the pool of addresses available to lease by the primary and secondary peers may get out of balance. The DHCP service will periodically go through a pool rebalancing process to balance the number of free addresses on each peer. You will see messages similar to the following in syslog:
dhcpd[4379]: info balancing pool c016c0 192.168.0.0/24 total 10 free 6 backup 2 lts 2 max-own (+/-)1
dhcpd[4379]: info balanced pool c016c0 192.168.0.0/24 total 10 free 5 backup 3 lts 1 max-misbal 1
These message show the “total” dhcp addresses for this range, the available addresses (free on the primary, backup on the secondary) and ‘lts’, which means ‘leases to send’ (from the primary to the secondary or vice versa).
Abnormal operation
When an event occurs to change the state of the failover association, it is useful to understand how the DHCP service will function during these different states. You can then plan the appropriate action to minimize the operational impact.
Each DHCP peer within a failover association can be in a number of states, as illustrated by the following, rather confusing, diagram:
![]()
State: ‘Communications-Interrupted’
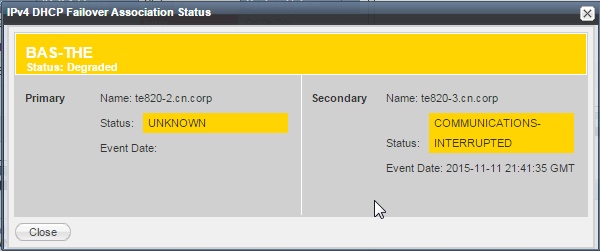
When the communication traffic between the two failover peers stops, the failover peer(s) enter the ‘Communications-Interrupted’ state. Depending upon the nature of the failure, the Infoblox GUI will show one or both peers entering this state (i.e. the grid master might be able to communicate with both peers, but the peers themselves can’t communicate with each other). The failover association status will identify which peer is still contactable by the grid master, but will change it’s state to ‘Communications-Interrupted’, the other peer may simply be listed as ‘Unknown’ if the grid master has lost communication with it.
![dhcp failover detail]()
A few events that may cause this state are:
- One of the peers failing.
- A network issue is preventing the two peers from communicating (but both peers may still be seeing other DHCP traffic).
- The peers are not synchronized with the same time.
During the ‘Communications-Interrupted’ state, peer(s) will only allocate or extend leases for the MCLT period, e.g. 1 hour, as they cannot update their partner with lease information. This means that the servers will be busier than ‘Normal’.
A few things to note about the ‘Communications-Interrupted’ state:
- A peer will only issue NEW leases from its pool of available leases (FREE on the primary peer, BACKUP on the secondary).
- If one of the peers has failed, the surviving peer will not start issuing out the leases that were available on the failed peer. Once it has exhausted it own pool of FREE or BACKUP addresses, it will no longer be able to issue any new leases. It’s at this point that an outage will be detected by normal users as new clients (e.g. laptop, mobile or wireless clients) will not be able to connect to the network.
- A peer can renew any lease currently in use, whether it leased it out originally or the partner peer leased it.
- Once a lease end time has passed (the client did not renew the address and the lease expiry timer has passed), it will not go back into the pool of available leases. This could lead to ‘lease exhaustion’ on networks where there is a reasonable client turnover, if the failover association is left in the ‘Communications-Interrupted’ state for an extended period of time.
Once alerted to a failover association going into the ‘Communications-Interrupted’ state, an assessment should be made as to how long before this can be recovered. If it is a network outage with a quick fix, you may want to leave it in ‘Communications-Interrupted’ until the issue is resolved. If it is a little more terminal, then you should consider moving to the ‘Partner-Down’ state.
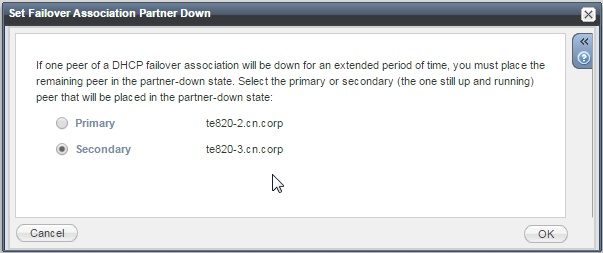
State: ‘Partner-Down’
If the problem that triggered the ‘Communications-Interrupted’ state is going to take a while to resolve then putting a peer into ‘Partner-Down’ should be considered. ‘Partner-Down’ is an administratively entered state, whereby an Infoblox admin will put one peer into ‘Partner-Down’ using the Infoblox GUI. Note, it is important to understand which peer you select when putting it into ‘Partner-Down’ mode, make sure you select the peer that is still up and running, you are telling it that it’s partner is down:
![dhcp set partner down]()
Once the peer enters this state, it will reclaim all leases that belonged to its peer:
- Available leases (FREE or BACKUP) will be reclaimed after MCLT plus STOS (Start Time Of State) has passed.
- Leases in other states (ACTIVE, EXPIRED, RELEASED) will be reclaimed after the potential expiry timer, plus MCLT has passed (if this is later than MCLT + STOS)
So, it will still take at least an hour (if the MCLT is set to the default value) before the peer in ‘Partner-Down’ can start to lease out addresses that were owned by its peer. This one hour period could seem like an eternity in a outage situation, so there may be justification for using a shorter MCLT when defining the failover association. It’s difficult to appreciate the importance of this setting unless you experience an outage.
There is one really important factor to consider before putting a peer into ‘Partner-Down’ mode:
Before putting one peer into partner down, ensure that the DHCP service on the other peer is not running!
Why is this important? If both the peers are operational when you place one of them into partner-down mode, both servers may stop issuing leases for a period of time when communication is re-established, as they will probably go into the ‘Potential-Conflict’ state. This is a bad state to be in and may lead to a service outage.
How to stop the DHCP service on a peer
If one of the peers is down due to a box failure, then we can be reasonably confident that the DHCP service is no longer running on it.
However, if there is a network issue that is stopping failover communication traffic and you decide to go into partner down, then the DHCP service must be stopped first on one of the peers. If the grid member can still be managed from the grid master GUI, then the service can be stopped using the GUI. If not, but SSH works to the peer, then either run the ‘set safemode’ CLI to disable DHCP (note that this also disables DNS) or shut the box down (which will need a visit from someone to switch it on again).
I’ve heard someone say “we could just disable the switch port” the peer is connected to. This won’t work as the DHCP service will still be running. Remember that the peers keep a log of the ‘Start Time Of State (STOS), so when both peers start talking again, they will check when they entered the last state and you could get a conflict.
Behaviour in ‘Partner-Down’
The surviving peer that was put into partner down will start the process of reclaiming addresses, once the relevant timers have expired. Once an address is reclaimed, the peer can now lease it out.
Whilst in the ‘Partner-Down’ state, lease times will be given out using the MCLT value (i.e. 1 hour).
Recovering from ‘Partner-Down’
Once the problem with the failed peer is resolved and is back online, it will go through a recovery process and then both peers should go back to the ‘Normal’ (green is good) state, issuing leases as normal.
The recovery process involves the two peers resynchronizing. Typically this would mean the failed peer waiting for MCLT to move to the ‘Normal’ state and start issuing leases, but Infoblox have tweaked the process a little to speed this up:
- If no changes have been made in the grid, a “fast recovery” mode is used and a move to the ‘Normal’ state is made without waiting MCLT seconds.
- Recovery is now done at the range level and not for the entire range of addresses.
State: ‘Potential-Conflict’
This is typically found when one peer has been put into partner down, whilst the other peer is still running. It is not a good state to be in!
Once the peers enter this state, they immediately stop serving DHCP addresses and go through a conflict resolution process which involves:
- The secondary peer sending changed lease information to the primary peer. The primary then moves to the ‘Conflict-Done’ state.
- The primary peer then sending changed lease information to the secondary peer. The secondary then moves to the ‘Conflict-Done’ state.
Once both peers have moved to the ‘Conflict-Done’ state, they will then both move to the ‘Normal’ state and are good to go. Note, the RFC says that the primary server can start issuing leases once it has moved to the ‘Conflict-Done’ state, but in this implementation it doesn’t – it waits for the secondary peer to transition to the ‘Conflict-Done’ state also.
That sounds easy enough, right? Let’s look at a real-world case of a ‘Potential-Conflict’ issue:
The secondary server sends lease information to the primary:
13:33:53 dhcpd: info failover peer IB-FO-Pair: peer moves from communications-interrupted to potential-conflict
13:33:53 dhcpd: info Update request from IB-FO-Pair: sending update (334 leases)
14:04:13 dhcpd: info failover peer IB-FO-Pair: 1000 leases sent
14:24:03 dhcpd: info failover peer IB-FO-Pair: 2000 leases sent
14:31:27 dhcpd: info Sent update done message to IB-FO-Pair
14:31:31 dhcpd: info failover peer IB-FO-Pair: peer moves from potential-conflict to conflict-done
-> This took about 58 minutes.
(Note: during recovery, a message is logged in syslog for every 1000 leases sent)
The primary server sends lease information to the secondary:
14:31:33 dhcpd: info Update request from IB-FO-Pair: sending update (1277 leases)
14:37:13 dhcpd: info failover peer IB-FO-Pair: 1000 leases sent
14:45:12 dhcpd: info failover peer IB-FO-Pair: 2000 leases sent
14:53:54 dhcpd: info failover peer IB-FO-Pair: 3000 leases sent
14:58:41 dhcpd: info failover peer IB-FO-Pair: 4000 leases sent
15:00:23 dhcpd: info failover peer IB-FO-Pair: 5000 leases sent
15:01:11 dhcpd: info failover peer IB-FO-Pair: 6000 leases sent
15:01:26 dhcpd: info failover peer IB-FO-Pair: 7000 leases sent
15:01:37 dhcpd: info failover peer IB-FO-Pair: 8000 leases sent
15:01:37 dhcpd: info Sent update done message to IB-FO-Pair
-> This took about 30 minutes.
So, there was no DHCP service for around 90 minutes. The previous lease time given to clients was 60 minutes (MCLT), so every DHCP client dropped off the network at some point.
The lesson here is not to get into a ‘Potential-Conflict’ state if you can help it. But if you do find yourself in it, then you probably want to go back into ‘Partner-Down’ (correctly) and then transition out again.
Force Recovery
One other option in the GUI is ‘Force Recovery’. This can be used when the primary and secondary peers are not synchronized. This puts the primary peer into the ‘Partner-Down’ state and the secondary server in the ‘Recover’ state. During a force recovery, all leases in the databases are resynchronized; the secondary peer will not serve any DHCP leases for at least the MCLT time (probably 1 hour) whilst resynchronizing with the primary.
This option should not be performed without due consideration, and you probably want to speak to your Infoblox support partner first before taking this action.
Wrap up
There is a lot of information to digest here! This article is based on experiences gained during a real-world DHCP outage that occurred at a large company several years ago. The root cause was an incorrect NTP configuration that caused the DHCP peers to lose synchronization because the clocks drifted too far apart. This meant that the peers entered communications interrupted state for an extended period, which led to lease exhaustion, ultimately resulting in clients not being able to access the network. The customer panicked, started rebooting appliances, disabling switch ports and putting peers into partner-down mode, and the DHCP peers ultimately entered ‘potential conflict’ state, which just made everything worse.
The moral of the story is that while DHCP failover is quite complex, it does work pretty well if it is set up and managed correctly. It’s easy to blame the protocol but most issues seem to be related to problems in the customers environment – just take a look at one of my rants here from a few years ago! Having an understanding of how it works is critical in this regard, and we hope that by publishing this article we can save someone from a potential DHCP outage through lack of understanding.
Feel free to post a comment if you have any thoughts or questions.
The post Using Infoblox DHCP failover appeared first on DNS, DHCP, IPAM (IP Address Management) | Cloud Wi-Fi | SD-WAN | Calleva Networks.


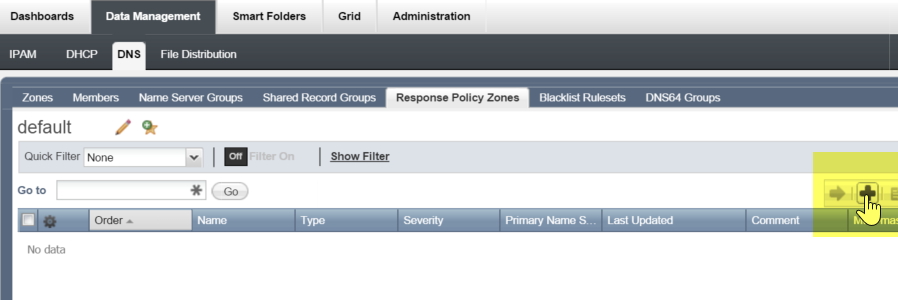
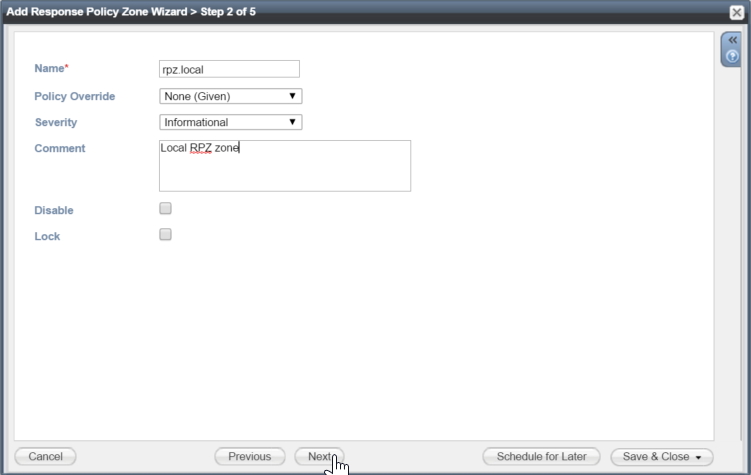
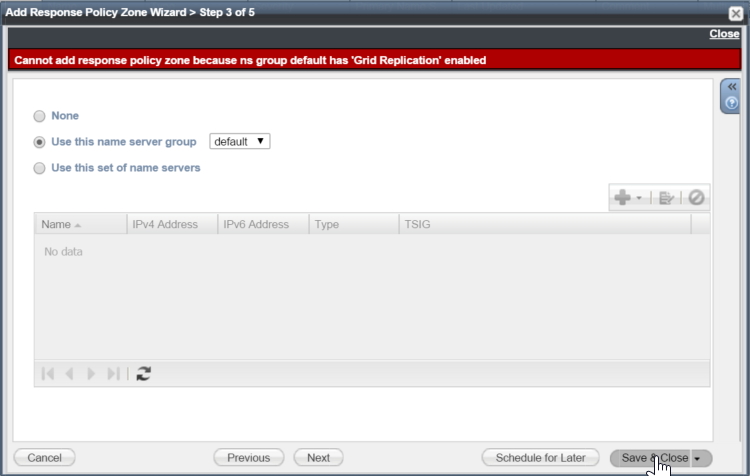
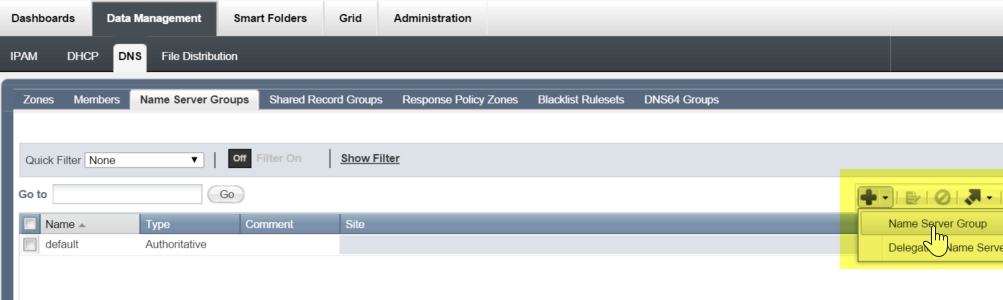
 DANE has been around for a few years now but still seems to be a bit of an underground topic. It hardly ever crops up in conversations I have with prospects and the fact it is reliant on DNSSEC, which takes a serious commitment to implement, makes me wonder if this is just another good idea that is going nowhere.
 More and more malware is using DNS not only to contact command-and-control servers but as a data exfiltration mechanism that can see your valuable and precious data “leaking” out from the confines of your organisation.
 There has been a slew of DNS Firewall related market activity recently that makes me wonder if DNS Firewall related products/solutions are finally gaining market acceptance.